While looking through my newsfeed this morning, I came across a giveaway being sponsored by one of my favorite blogs, All Things Paper. The product being given away is by Brookeshore Designs, who I now LOVE! Go take a gander at their collection of stationary designs. They are just gorgeous and the colors are amazing! If you want to participate in the giveaway, you can find details here. Best wishes and have a great rest of your week!!
Jen
Wednesday, July 25, 2012
Wednesday, April 25, 2012
Put A Little Heart Into It
I don't typically post twice in 1 day but I saw an idea on Pinterest this morning and I had to try it. It was quick, easy, and I had everything I needed on-hand. The original blog post can be found HERE and is a very cute idea! I did basically the same thing, but put my own little spin on it.
Here is a picture of the original idea that I saw.

I followed the instructions as she had laid them out to start with. I cut a heart out in 2 pieces of paper taken from an old paperback novel.
This is the candle that I started with.

This is what it looked like when it was finished. All in all, I was pretty pleased.


Here is a picture of the original idea that I saw.

I liked the idea well enough but the thought of putting paper inside the jar made me really nervous. Also, the jar I wanted to use already had a candle in it and there was no room on the inside to fit paper in. I followed the instructions as she had laid them out to start with. I cut a heart out in 2 pieces of paper taken from an old paperback novel.
This is the candle that I started with.
Since I wanted the paper to be on the outside of the jar, I decided to use Mod Podge to glue it down. I knew that it would be a heat resistant glue that would hold on even when the jar gets warm and I knew that it would act as a sealant over the top as well. I used "Paper Mod Podge" to attach the paper to the jar, on the back side and over the tops of the side edges.
I then attached the 2nd piece of paper on the opposite side of the jar in the same manner.
I then flipped the jar over and used the Paper Mod Podge to create a ruffled look and glue the bottom edge down around the curve of the jar.
I then flipped it back upright and put a coat of "Sparkle Mod Podge" over the top of the entire thing. I left the top edge of the paper sticking up, not affixed down. I also used the rough edge of the paper (where it was torn out of the book) as the top edge of the paper.
Last, I took one of the hearts that had been cut out and used the Sparkle Mod Podge to affix it to the lid.
This is what it looked like when it was finished. All in all, I was pretty pleased.
Homemade Laundry Detergent
A couple of weeks ago, I decided that I wanted to start making as many household cleaners, detergents, soaps, etc as I could, homemade. So I started googling and searching pinterest and I found several good tips and "recipes" for homemade laundry detergent (the powder variety, not the liquid.) I was excited at the prospect of costs savings as well as knowing everything that is going into my cleaning products! I found 1 blog in particular that I thought made it simple, had a great analysis of the reasons for making homemade laundry detergent, and included a good "how-to" tutorial. You can find that blog post here.
And if you're not interested in a cost-analysis breakdown of store-bought detergent versus homemade detergent, here it the simple bottom line:
Homemade Powder Laundry Detergent:
Ingredients:
1 cup 20 Mule Team Borax
1 cup Arm & Hammer Super Washing Soda
1 bar Fels-Napatha Laundry Soap, grated (Or brand of choice)

Directions:
Using a cheese grater (or any type of grater that will achieve the same affect), grate the entire bar of laundry soap into a medium sized mixing bowl.


And if you're not interested in a cost-analysis breakdown of store-bought detergent versus homemade detergent, here it the simple bottom line:
Homemade Powder Laundry Detergent:
Ingredients:
1 cup 20 Mule Team Borax
1 cup Arm & Hammer Super Washing Soda
1 bar Fels-Napatha Laundry Soap, grated (Or brand of choice)
Directions:
Using a cheese grater (or any type of grater that will achieve the same affect), grate the entire bar of laundry soap into a medium sized mixing bowl.
Add the borax and the super washing soda and mix thoroughly. It needs to be very, very, very well mixed together. I stirred for about 5 minutes.
TA-DA! You're done. No, really. You're done. I used a plastic bowl that has it's own lid to keep it fairly air-tight.
Use: 1-2 tbs per load of laundry
The blog I got the information from said to use 1 tbs per load of laundry (2 if it is a heavily soiled load or if you just feel like you want more detergent.) I know it doesn't seem like much but it really does get the job done. I start my water in an empty washing machine, add the detergent sprinkled all around the bottom evenly, and then let it sit and dissolve for about 2-3 minutes before adding my load of laundry.
I've used it for 2 loads so far and I LOVE the outcome I've had. One load was for sheets that my son had had a bed wetting accident on and they smelled fresh and clean! What I really love about it is, since the super washing soda and borax are both odor neutralizers, my laundry smells fresh and clean and the only fragrance it has is my fabric softener.
I keep my tablespoon in the bowl with my detergent and I suggest that you stir the mixture each time before you use it, as the soap tends to settle to the bottom as it is sitting.
So there you go, homemade laundry detergent. All of the ingredients cost me about $10 and they should make AT LEAST 3-4 batches of detergent. Using only 1-2 tablespoons per load, 1 batch should last between 32-64 loads of laundry. So total, 1 box of borax, 1 box of super washing soda, and 4 bars of laundry soap will do 128 - 256 loads of laundry (depending on how much you use per load) for about $10!!! Yippee!
Now, go forth and save money whilst making clean linens!
Tuesday, April 24, 2012
Something Old, Something New...
... it's not borrowed but it's blue! (I know, I'm a total nerd.) I have been going through all the things that I brought home from my Grandparent's estate lately. I came across this kitsch recipe holder:


I loved the idea of a counter top recipe holder that would stand there and let me read my recipe as I am cooking. But it was really beat up and.. well... ugly. So I decided it needed a makeover. I knew I wanted blue and silver/gray to go with my kitchen. My first attempt was good but not quite what I was looking for:


So I decided to tape it off and go for another look...


I was very happy with the final result. I love this it is still kitsch a throwback to the 1950's/1960's in design but with a more modern take in appearance.


I took it apart. I painted the pedestal gray and the flat board blue. I did a couple of coats. After the last coat was sufficiently dry, I made a checkerboard with painters tape. I then painted it all gray, with just 1 coat. I wanted some of the blue to show through the gray. I wasn't overly specific about the way I cut the painters tape. I wanted to edges to be a little rough. I pulled the tape up as soon as I was done painting, which also helped with the "rough-edges" look. I painted the hooks gray by hand also although, were I to do it again, I would probably spray them. After it was all dry, I sprayed the whole thing with acrylic clear coat for a little bit of a shiny appearance. All in all, I am very pleased with it.
So what about you? What things do you have lying around that house that you can give a little makeover to? I love making old things new again!
Wednesday, April 18, 2012
Burried Treasure
When my grandfather passed away about a year ago, I inherited some of his and my grandmother's things that were dear to me and/or that my family thought I should have. One such item was a tub filled with what was described to me as my grandmother's fabric stash. She was a seamstress as well as a needle crafter and she had stuff stashed everywhere.
This week I finally got around to going through the fabric stash and was surprised to find that it not only contained unused fabric (which will certainly be put to good use), but also unfinished projects!
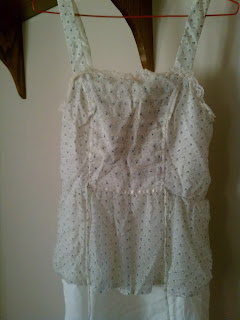
I was so excited to find them. Among some of the projects were 2 unfinished dresses. Well, I actually think my grandmother was intending for them to be nightgowns. But, times have changed and I think they would actually make very cute, and somewhat retro sundresses.
I am not a seamstress. My sewing skills (by hand or with a machine) are very basic. But my mother-in-law is a very accomplished seamstress and so I am calling on her to help me get these 2 projects completed. Well, at least 1 of them anyway. One of the gowns in done with the exception of needing the straps sewn on, which I think I can handle.


The other needs a bit more work. The bodice is finished and the slip is attatched but the overskirt still needs to be attatched and I am not confident in my ability to complete that talk alone. So I am going to be using the oppertunity to get a sewing lesson from m mother-in-law whilst also finishing something that my grandmother started. Both thoughts leave me elated.


This week I finally got around to going through the fabric stash and was surprised to find that it not only contained unused fabric (which will certainly be put to good use), but also unfinished projects!
I was so excited to find them. Among some of the projects were 2 unfinished dresses. Well, I actually think my grandmother was intending for them to be nightgowns. But, times have changed and I think they would actually make very cute, and somewhat retro sundresses.
I am not a seamstress. My sewing skills (by hand or with a machine) are very basic. But my mother-in-law is a very accomplished seamstress and so I am calling on her to help me get these 2 projects completed. Well, at least 1 of them anyway. One of the gowns in done with the exception of needing the straps sewn on, which I think I can handle.


The other needs a bit more work. The bodice is finished and the slip is attatched but the overskirt still needs to be attatched and I am not confident in my ability to complete that talk alone. So I am going to be using the oppertunity to get a sewing lesson from m mother-in-law whilst also finishing something that my grandmother started. Both thoughts leave me elated.


I don't know how quickly I'll be getting them completed since my schedule and hers are both pretty crazy right now. But hopefully it will get done in the next couple of months. I'll post the completed poduct once we're done!
Saturday, April 14, 2012
As the world turns, I am somewhat young and a little restless, but these are the days of my life and I love all my children
So, you see a theme in the title, eh? I don't really watch soaps much. Well, let me quantify that. I USED to watch several of them. Now, I really only watch The Young & The Restless. And sometimes I think that is more for sentimentality than anything.
When I was a kid, my mom was a teacher and every summer when she was home, she would always watch Guiding Light and The Young & The Restless. Y&R became like a staple in our home. And my neighbor (and best friend)'s mom also watched it. So when she and I were about Jr. High aged, we started wathing it together during the summers also. And so it lives on. I DVR Y&R everyday. So sad, but true.
Anyway, that really has nothing to do with anything except to say that as I was watching it the other day it got me to reminescing in my own mind about my childhood and the things I most remember. And then I started thinking about my own children and what things they might remember someday.
My oldest child is going to be 6 in about 2 weeks. I am so proud of her and so excited for her, as she is very excited to be turning 6 also. But as I was sitting there thinking, I started remembering her birth and when she was 18 months old, and when she was 2 (which is the age of our current youngest). And it suddenly struck me that, though she has several years of growing left to do in our home, turning 6 and starting 1st grade next year really marks the end of the first official "stage" of her life. She is becoming a big kid. She has outside influences and friends now. She is learning things about the world that her dad and I are not teaching her, just through experiencing the world. And while she is still plenty naive and precious, a certain amount of her naivety is gone now.

I couldn't help but start crying. Not because I wanted to keep her little forever or because I think that her life isn't going to turn out wonderfully. Mostly because it suddenly made me keenly aware of how quickly time passes. I wasn't ready to be done with that part yet. There were still too many days at home I wanted to have with her. There were still too many silly songs I wanted to sing and board books I wanted to read without hearing, "Oh mom, I'm too big for that now" or "Really mom, I'd rather watch Strawberry Shortcake right now".

My daughter still likes to cuddle. She still likes to read books with me and sing songs with me. But they are chapter books now. And the songs are starting to get a little more grown up.
But then I thought, I have to embrace this stage for everything it is and enjoy every second of it now or I will turn around and it will be gone too.
So we are baking together. And crafting together. And I want to teach her to crochet now. And she is learning to be a young lady. We are reading "Little House on the Prairie" together. And we are sharing stories and jokes together and laughing. And I love this stage with my daughter, regardless of how much I may miss the previous stage.
And, it made me very aware of how much I need to stop and enjoy the young stage that my 2 year old and my 4 year old are both currently in right now. I will always charish the memories. I just want to make sure I am making plenty of them to take with me. And for them to keep also.

Stop and enjoy your life now. You only get to do it once.
When I was a kid, my mom was a teacher and every summer when she was home, she would always watch Guiding Light and The Young & The Restless. Y&R became like a staple in our home. And my neighbor (and best friend)'s mom also watched it. So when she and I were about Jr. High aged, we started wathing it together during the summers also. And so it lives on. I DVR Y&R everyday. So sad, but true.
Anyway, that really has nothing to do with anything except to say that as I was watching it the other day it got me to reminescing in my own mind about my childhood and the things I most remember. And then I started thinking about my own children and what things they might remember someday.
My oldest child is going to be 6 in about 2 weeks. I am so proud of her and so excited for her, as she is very excited to be turning 6 also. But as I was sitting there thinking, I started remembering her birth and when she was 18 months old, and when she was 2 (which is the age of our current youngest). And it suddenly struck me that, though she has several years of growing left to do in our home, turning 6 and starting 1st grade next year really marks the end of the first official "stage" of her life. She is becoming a big kid. She has outside influences and friends now. She is learning things about the world that her dad and I are not teaching her, just through experiencing the world. And while she is still plenty naive and precious, a certain amount of her naivety is gone now.

Michaela Mary, 1 1/2 months old.
I couldn't help but start crying. Not because I wanted to keep her little forever or because I think that her life isn't going to turn out wonderfully. Mostly because it suddenly made me keenly aware of how quickly time passes. I wasn't ready to be done with that part yet. There were still too many days at home I wanted to have with her. There were still too many silly songs I wanted to sing and board books I wanted to read without hearing, "Oh mom, I'm too big for that now" or "Really mom, I'd rather watch Strawberry Shortcake right now".

Michaela Mary, 5 years old.
My daughter still likes to cuddle. She still likes to read books with me and sing songs with me. But they are chapter books now. And the songs are starting to get a little more grown up.
But then I thought, I have to embrace this stage for everything it is and enjoy every second of it now or I will turn around and it will be gone too.
So we are baking together. And crafting together. And I want to teach her to crochet now. And she is learning to be a young lady. We are reading "Little House on the Prairie" together. And we are sharing stories and jokes together and laughing. And I love this stage with my daughter, regardless of how much I may miss the previous stage.
And, it made me very aware of how much I need to stop and enjoy the young stage that my 2 year old and my 4 year old are both currently in right now. I will always charish the memories. I just want to make sure I am making plenty of them to take with me. And for them to keep also.

Michaela (5), Christopher (4), and McKenzie (20 months)
Stop and enjoy your life now. You only get to do it once.
Wednesday, April 11, 2012
FINALLY FINISHED!
I've been working on a couple of these projects on an on-again, off-again basis since December 2011 and I am SO glad to have them completed! The link posted above each pic below is to my ravelry post for that project and it will have the link and information for the pattern for any project you see that you are interested in. Let me know if you have any questions!


Thursday, October 27, 2011
Early Girl Dress
I FINALLY finished Michaela's Early Girl Dress. The pattern is from the Summer 2011 issue of Interweave Crochet. It's a great pattern, written by Lisa Naskrent (the link is to her Ravelry designer page). It took me forever to complete, only because I kept getting distracted by life and just left it sitting for weeks at a time. At least it's finally done. Here are a couple of pics:


I was very happy with how it turned out and Michaela LOVES it! Of course, it's purple so I expected nothing less. I used Berroco Comfort DK and I loved the yarn. For locals, I got it at Village Stitches in Bloomington. It is fairly accesible yarn at most yarn shops and online however. The link is for Village Stitches ravelry shop page however, you can also find them on Facebook here.
I have now moved onto an Autumn table runner, knitted. It is progressing nicely, and MUCH more quickly than the dress did. What about you? What have you been working on? If you're on Ravelry, drop me a line and let me know. I'd love to "friend" you and see projects you have or are working on! Happy stitching folks enjoy the holiday season!
Saturday, October 01, 2011
The Beauty God Made
This is not really needle-craft, nor fiber-art related but I felt the need to post. I have developed a slight addiction to Pinterest. Recently, I have been pinning photos of gorgeous places around the world that I have either been to or would love to some day visit. They are extremely varied in climate, scenery, location, terrain, etc., but they are all breathtaking. I want to share of few of them with you.


Bali
The British Countryside
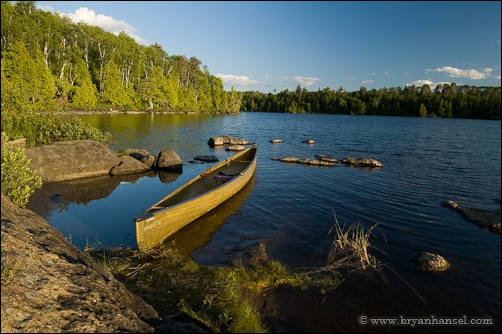
Boundary Waters Canoe Area, Minnesota

Chile

Durango, Colorado

French Coast

Irish Coast

Mount Roraimo, Venezuela
Nepal

New River Gorge, West Virginia

Scottish Highlands

Svalbard

Rural China

Thailand

Morocco
I guess the point of this quaint post is to say that I am stunned by the beauty that God has surrounded us with. There is nowhere you can go on this planet and not find something of inexplicable, natural beauty. Seasons change, people are born and die each day, and yet Earth never stops shining with beauty. Take sometime to be thankful for nature and the awesome creation that is life.
Subscribe to:
Posts (Atom)